
Infuriating, isn’t it?
When a site loads so slowly you want to throw your computer out of the window.
Entire seconds pass before anything at all appears in your browser, and you start to wonder if the site even exists!
When it does respond, watching the site appear piece by piece is like a form of torture.
And by the time it finally loads, you’re so frustrated with the whole experience that you’re half-tempted to click away without reading any of the content.
After all, what self-respecting blogger would allow his or her blog to perform like this?
But before you climb on your high horse, ask yourself this question:
What if this is exactly how other people feel about your blog?
That’s right, your blog.
You’d feel mortified, right? The owner of the slowest blog on the block.
But better to find out sooner rather than later so you can fix it if necessary.
Let’s find out how . . .
The Psychological Effects of a Slow-Loading Website
Have you ever called a customer service line and sat in the queue for ages? You waited around, tapping your fingers on the desk, as minutes of your precious time flew by.
As time passed, you probably forgot why you called in, and the only thing you could concentrate on was your rising frustration. By the time someone finally picked up your call, you weren’t grateful, you were just angry.
Now, think about a time when you dialed a support line and your call was quickly answered by someone happy and eager to help you.
It felt nice, right?
Well, your visitors feel the same way about landing on your website.
A slow website is like poor customer service. Instead of waiting patiently for your content to load, visitors are more likely to become frustrated and leave. Even if they hang around, they’ll be skeptical about the quality of your content.
A fast-loading website, on the other hand, gives readers a good experience from the outset and shows your content in the very best light.
Why Google Hates Slow Websites Too
In addition to providing a poor user experience, your site’s search rankings can be affected by sluggish performance.
That’s because Google has been known to punish websites with slow load times.
Page load time is just one of many factors that determine your rankings, but why put your site at a disadvantage? A lower ranking means reduced exposure for your content.
After all, SEO is complicated enough without introducing issues you can easily fix.
In addition, your site’s speed is particularly important for mobile devices since their networks are not as fast or reliable as the fixed connection you’d expect when working from a desktop. As you probably know, the number of people accessing sites via mobile devices continues to climb, so this issue will only become more important.
(If you want to stop mobile users bouncing, you need to make sure your site looks great on mobile too, but that’s another story.)
So how do you know if your website even has a performance problem?
Warning: Your Site Speed Problems May Be Hidden from View
Even if your site seems fast enough to you, it may not seem so to others.
In fact, various reasons might cause your site to perform better for you than for new visitors. For example:
- Your browser will already have cached images that others will need to download.
- Your site may be hosted somewhere geographically closer to you than many of your visitors.
- You may be using a fast “wired” connection where others are relying on mobile networks.
Also, there’s an important perception factor. New visitors will be more acutely aware of your site’s performance because it’s their first experience – you’ll just be used to the speed you normally get.
Many articles on site speed will give you multiple potential problems to address along with ways to address them. However, blindly attempting to fix “potential issues” could render few, if any, results.
Why? Because all sites are different.
That’s why the key to solving any problems associated with your site’s speed is to test your website first.
How to Test Your Website’s Speed with GTmetrix
Let’s face it, you’d be dumb to try to fix a problem you may not have.
That’s why you should always test your website before attempting to improve its performance.
One valuable tool to have in your arsenal is GTmetrix.

GTmetrix
GTmetrix analyzes your website’s page load speeds and recommends solutions based on a proprietary grading system.
Here’s how to generate a performance report for your site:
- Go to the GTmetrix website.
- Paste in your website URL and click on the Analyze button.
- Wait a few seconds.
- View the report to see the results and recommendations.
As an example, here’s a report created for Boost Blog Traffic:
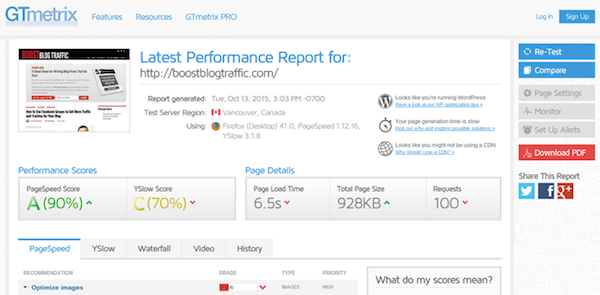
To give you an overview of your site’s performance, GTmetrix uses the following metrics:
- PageSpeed Score – This is Google’s system for scoring your website’s speed and overall performance. (Remember, if Google thinks your site is fast, that’s good for SEO.) The letter next to the score is an overall grade for your website based on its score – A is the best grade, F is the worst. The arrow indicates how your site’s score compares to the average – in this case, the up arrow means it’s higher than average.
- YSlow Score – This is Yahoo’s system for scoring your site’s speed and overall performance. Again, your score is given a grade, and an arrow shows how the score compares to other websites analyzed by GTmetrix.
- Page Load Time – This is how long it takes an average user to view an entire page on your website. A shorter page load time is best. If you hover over the arrow, you can compare the average load time of other websites to yours.
- Total Page Size – This indicates the average file size of your website’s pages. The goal is to have small file sizes, and again, you can compare your site to others evaluated by GTmetrix by hovering over the arrow.
- Requests – This is the number of individual file requests (e.g., for HTML, CSS files, images, etc.) needed to load the page. Each request has an overhead for establishing and “tearing down” a connection, so it’s best to have fewer requests to reduce the load on your server and overall response time.
While this data is interesting, the real benefit of running the report is the list of recommendations GTmetrix creates based on its results.
Here’s an example:
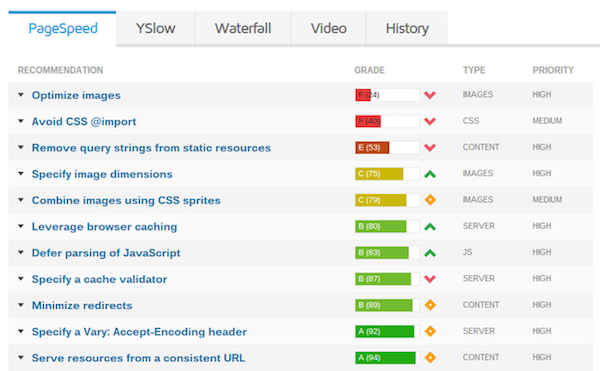
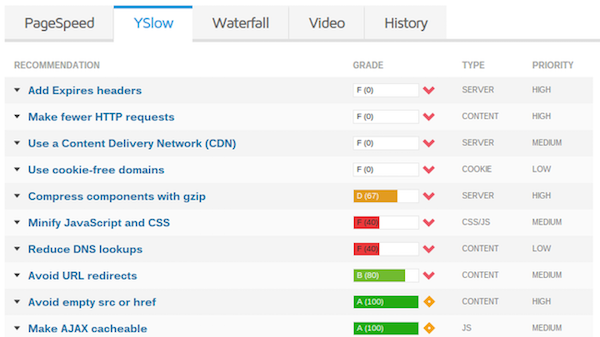
GTmetrix groups potential problem areas into easy-to-understand recommendations such as “Optimize images” or “Leverage browser caching.” The issues requiring the most urgent attention are at the top with the remaining recommendations listed in the order they affect the website’s speed.
Click on the arrow located to the left of each recommendation to get an explanation of each issue and the specific problem areas.
GTmetrix is one of the best tools available for testing your website’s speed and performance, but it’s not your only option – other free tools such as PageSpeed Insights (from Google) and Pingdom are also good choices. Whichever you go with, picking one tool and sticking to it is probably the smartest strategy.
How to Make the Optimizations Your Blog Needs
Reports like the one generated by GTmetrix are invaluable, but the lingo can be intimidating. If you don’t understand the recommendations, how are you to make any improvements?
So let’s look at some of the more common types of recommendations and see how to implement them in practice.
#1: Optimize Images for Faster Loading and Lower Server Stress
Poorly optimized images are one of the most common causes of website performance issues. Images, regardless of their file format, are often too large, consuming unnecessary space on your server and taking longer than necessary to transfer to your visitor’s browser.
The goal of image optimization should be to find the right compromise between the quality of an image and its file size. That being said, to optimize an image correctly, you must first ensure it’s in the right format.
A Crash Course in Popular Image Formats
There are three image formats the average blogger is likely to encounter:
- GIF (Graphic Interchange Format) – GIF is one of the oldest image file types still in use and works best for images with large text elements or areas of flat color such as simple logos, icons, or symbols. They usually result in relatively small file sizes but due to their limited palette (only 256 colors) it is not recommended you use this format for photographs or images with lots of detail. However, one important feature is that GIFs also support simple animations.
- PNG (Portable Network Graphics) – The PNG format was designed as a replacement for GIF. It supports a much higher number of colors and tends to produce smaller file sizes, particularly for images like screenshots. PNG used to have an issue of not being supported by older browsers, but these days the only practical advantage of GIF over PNG is the animation feature.
- JPEG (Joint Photographic Experts Group) – JPEG is a popular image format, used by over 70% of website owners. You can use JPEGs for images of any type, but they were designed primarily for photographs. The format is particularly good at compressing the rich detail of a photo so that it displays well at different sizes while still creating a very small file.
When it comes to choosing the best format for new images, here are some simple rules to follow:
- If your image is a photograph or a complex image with lots of detail and colors, use JPEG.
- If you image is a screenshot, illustration, or has lots of text, use PNG.
- If you want to use simple animation (but you don’t want to embed a video player), use GIF (but avoid it in all other situations).
Now that you have an idea of the different online image types you might be uploading to your website, let’s take a look at the proper optimization steps you should take before uploading any image.
Step 1) Crop Your Images
The first step to optimizing an image for your website, whether it be a diagram, a photograph, or a screenshot, is to crop your image.
The original version of an image – for example, one taken with your camera or captured from your computer screen – is unlikely to have the perfect framing.
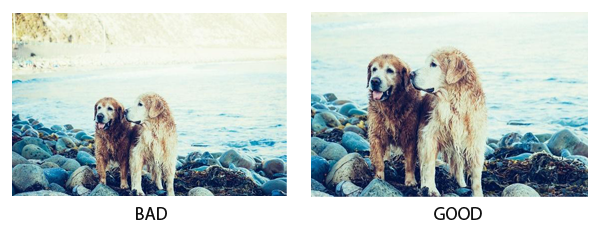
Cropping elements that detract from the main focus of your image achieves two things. First, it draws your reader’s attention to the important details. Second, it naturally decreases your image file size, which is great for optimization.
Here’s an example of a photograph which has been cropped to emphasize the main subject, the two dogs:
You have several options for cropping your images.
For instance, the pre-installed Paint application works for Windows users. Likewise, Preview is a good choice for Mac users.
Another great image editor available for desktop use is Gimp. This free software is similar to Photoshop and has a large number of image editing tools, including a cropping feature. It conveniently works on Linux, Mac, and Windows computers.
Step 2) Resize Your Images
Often an image, regardless of its format, is far too large for your blog.
There’s little point in uploading an image from your camera or smartphone that’s over 3,000 pixels wide if the largest size you’ll display it on your blog is 600 pixels wide.
Remember, larger files take up more space, cause additional strain on your server, and take a long time to upload when a visitor views a page containing that image. Plus, depending on your website’s theme, larger images may not even render correctly on the page.
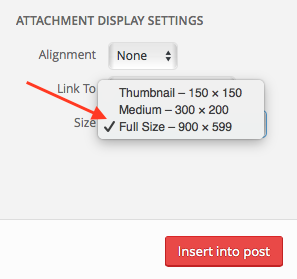
WordPress attempts to solve this issue by automatically creating three different versions of any image you upload – thumbnail, medium, and full size. This resizing process creates additional load on your server and doesn’t actually save disk space because it stores the image at its original size too.
Also, when you add an image to a post from the Media Library, the default size is the original size, so you must manually select one of the smaller sizes.
The answer is to resize your images before you upload them. The tools mentioned in the previous step can also be used to resize your images.
If you are looking for an online-only solution that does not require a download of any kind, you might consider using the free options, Pixlr or Fotoflexer.
Step 3) Compress Your Images
File compression is one of the most important tactics for image optimization. By removing any unnecessary information embedded in your images (information the human eye cannot even perceive), you can efficiently decrease the image’s file size while keeping its quality intact.
TinyPNG
One solution for making your website’s image files smaller is to use a free online tool called TinyPNG. Despite the name, TinyPNG is a great resource for optimizing both PNG and JPEG files.
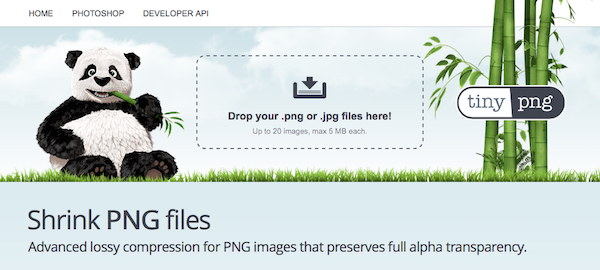
Using the tool is simple. Either drag and drop your desired image files into the designated area or click on the upload area and search your local hard drive for the images you want to compress. TinyPNG will then compress your image and provide a download link for you to save your new, smaller-sized image file to your computer.
When you are ready to upload your image to your website, simply go to Add Media in your visual editor, Upload Files, and either drag and drop your compressed image or select the appropriate files from your computer. The image selected will already be compressed (and should be resized and cropped as well), so it is optimized for use on your site.
(If you’re optimizing an image already in use on your site, you’ll need to update that image link to point to the compressed image.)
WP Smush
Another awesome tool for compressing your website’s images is to use the free WordPress plugin WP Smush. Rather than manually compressing images via TinyPNG, this plugin provides an automatic approach to image compression by optimizing images as soon as you upload them to your site. Simply uploading your image to the Media Library will initiate the “smushing” (a.k.a. compression).
WP Smush also gives you the option to bulk “smush” your already uploaded images, making their file sizes much smaller and more optimized.

The most powerful features (e.g., no file size limits and bulk smushing with one click) require a paid subscription. However, it may be worth it if you use a lot of images on your site or your images are causing significant problems with page load speeds.
Image optimization (cropping, resizing, and compressing) is one of the easiest ways to improve your website’s performance, particularly if you have an image-heavy site.
Incorporate it into your publishing routine and your readers will see the benefits almost instantly.
#2: Minify JavaScript and CSS for Smaller Files and Fewer Requests
A common recommendation from GTmetrix is to “minify” JavaScript and CSS files on your site. Along with your theme’s HTML and associated images, these files contribute to your site’s appearance and behavior.
Minifying these files essentially means making them smaller, for example by minimizing unnecessary white space.
Also, every time the server requests your content it makes a new connection; if you have several CSS and JavaScript files, the overhead can be significant. The more calls the visitor’s browser makes to your server, the more overworked your server becomes, and thus the slower you website will tend to load.
Minifying also combines your CSS and JavaScript files into a single file – usually one per file type. This can greatly decrease the number of requests required to fetch all the required information.
Several free WordPress plugins exist to minify your files. Check out Better WordPress Minify or WP Super Minify.
#3: Leverage Caching to Avoid Unnecessary Reloading of Resources
Caching plugins are one of the most effective ways to improve your website’s speed.
Normally, each time someone requests a page from your site, your server dynamically builds the page HTML from scratch using WordPress’s core code and your site’s theme. But the thing is, that HTML often stays the same from request to request.
Caching is the process of delivering static versions of HTML files to your visitors rather than creating them dynamically each time. Essentially, they create the files once and then store a copy. This decreases the amount of calls made to your server, lowers the server load, and reduces bottlenecks.
The best caching plugins also have other performance-related features, such as minification, meaning you would not have to use a separate minification plugin. Just be sure to check your caching plugin’s full feature set before ditching the minifying plugin.
Here are some of the most reputable WordPress plugins for caching, though you should only implement one at a time on your website to avoid internal conflicts amongst plugins:
- W3 Total Cache (installation guide)
- WP Super Cache (installation guide)
- WP Rocket (installation guide)
All three will work, but for this example, we’ll use W3 Total Cache since it minifies files as well. To enable server-side caching, follow these steps:
- Install and activate W3 Total Cache.
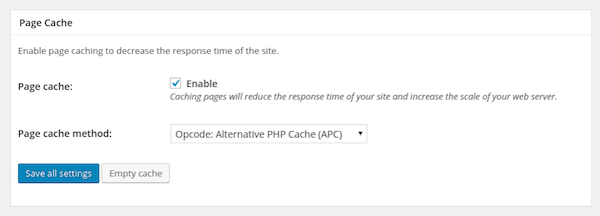
- Go to Performance > General Settings on the right-hand side of your WordPress dashboard and scroll down to the “Page Cache” section.
- Next to “Page cache,” click the checkbox to enable page caching.
- For “Page cache method:” select the recommended setting for your hosting setup (for instance, “Disk: Enhanced” is best for a shared server).
- Click “Save all settings.”
Caching is not limited to the server, however. The plugin also has settings that allow you to tell the visitor’s browser to cache certain files.
In fact, this feature specifically addresses the GTmetrix recommendation “Leverage Browser Caching.”
Here’s how to activate this functionality:
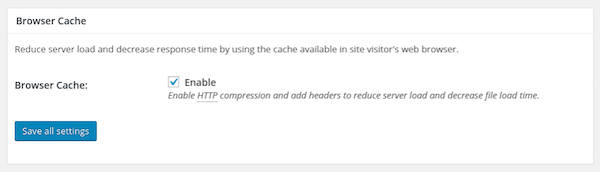
- Under General Settings scroll down to the “Browser Cache” section.
- Next to “Browser Cache,” click the checkbox to enable browser caching.
- Click “Save all settings.”
W3 Total Cache is a richly featured plugin with many different options. Understanding all the possibilities is beyond the expertise of most bloggers, but there is a simple way to switch on all recommended caching without worrying about the low-level detail.
Here’s how:
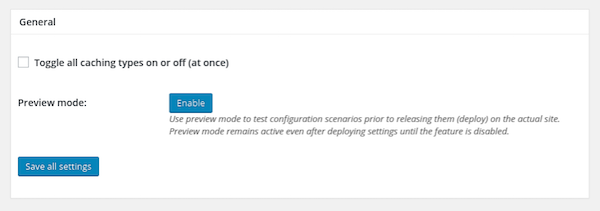
- Under General Settings, find the “General” section toward the top of the page.
- Click the “Enable” button to allow you to test any changes before deploying them to your site.
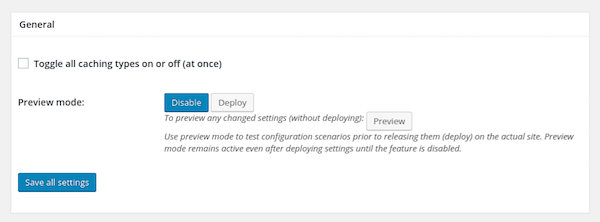
- Check the box adjacent to “Toggle all caching types on or off (at once)” – this will change the required fields lower in the page.
- Click the “Preview” button to make sure your site’s behavior seems normal.
- Assuming all is well, click “Deploy” to make the changes permanent, then “Disable” to disable the preview functionality.
#4: Identify Plugins That Are Dragging Your Site Down
Plugins. Your sweet, precious plugins.
They’re one of the main benefits of choosing WordPress over other blogging platforms, but they can also be a hidden enemy. Particularly when it comes to performance.
Too many plugins, or just one poorly coded plugin, can have more of an impact on your site’s performance than any of the other factors we’ve discussed so far.
How? Here are just a few of the causes:
- Additional HTTP requests. Some plugins, especially ones with rich front-end functionality, may require custom styling or scripts to work properly. This means that they add extra JavaScript and CSS file requests, causing higher server load and more demand on the network.
- Database-intensive queries. Many plugins store and retrieve data using the WordPress database, and inefficient or complex queries can cause significant load times and poor performance.
- Plugin conflicts. Some plugins don’t play nicely with other plugins or WordPress themes, causing potential security risks and performance issues.
It’s difficult to know for sure that a problem reported by GTmetrix is related to the plugins you have installed on your site.
Luckily, it’s pretty straightforward to evaluate your plugins to see if one or two are causing problems for the rest of your website, and to keep only the ones essential to your website’s functionality. Although it may be tough to let go of some of your favorite plugins, if they’re causing performance issues, that’s too high a price to pay.
One way to evaluate how your plugins are affecting your site’s performance is to use the P3 (Plugin Performance Profiler) plugin.
Here’s how to use it:
- Install and activate the P3 (Plugin Performance Profiler) plugin.
- Go to Tools > P3 Plugin Profiler (or find P3 Plugin Profiler on your main plugins page).
- Click “Start Scan,” then “Auto Scan.”
- Wait for the scan to complete (it might take a few minutes), then click “View Results.”
- Scroll down to the Runtime by Plugin graph.
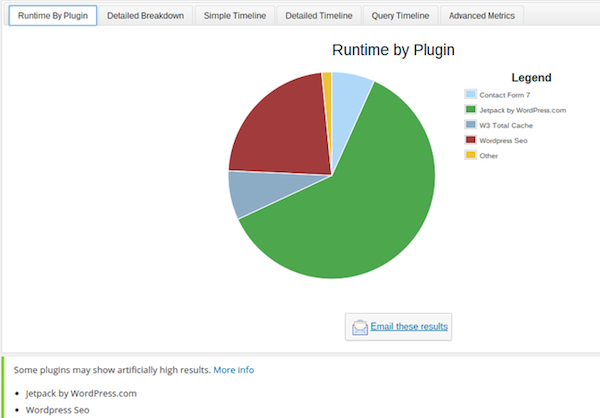
This chart shows which plugins are taking the most time to load on your website. Look out for plugins that seem to hog a disproportionate amount of time for the functionality they provide (or at least, for the value you get from that functionality).
If a plugin appears to be causing performance issues, try deactivating it and running the test again. And remember, if deactivating a certain plugin has a marked effect on performance, it might not always be the culprit. It may be that it conflicts with another plugin and that removing either one will solve the problem. So try to be systematic with your testing and don’t jump to conclusions too quickly.
Whenever you have made any changes to your configuration that you hope will improve performance, remember to rerun GTmetrix to discover the true effect. If removing a much-loved plugin has little effect on your site’s speed, and you have no other reason to believe it’s problematic, there’s no strong reason to remove it.
Give Your Visitors the Experience They Deserve
Website performance is a broad and complex topic, and we’ve only scratched the surface.
But you should now know enough to check your website’s basic performance.
So ask yourself, how does your site come across to your viewers?
Is it eager and responsive like a friendly, well-trained customer service representative?
Or does it keep people waiting in line while their frustration boils over?
Now you’re equipped with the knowledge you need, and poor performance can’t stay hidden any longer.
You even know how to resolve some of the most common problems.
It’s up to you to show visitors that their experience on your site matters. If your site performs well, they’ll assume your content is high-quality too.
Blazing fast speeds are not out of reach, so saddle up for the race.
You can leave your competitors in the dust.
No comments:
Post a Comment